https://bloggingwizard.com/wp-content/uploads/2016/09/1b-aweber-welcome-video-Email-Marketing-Tools.jpg [ad_1]
As a blogger, it’s all-too-easy to become side-tracked with the latest marketing trends.
SEO.
Paid advertising.
Blogger outreach.
Influencer marketing.
Social media marketing.
You name it. You’ve been sucked in.
And while there is nothing wrong with any of those marketing channels, haven’t you forgot something?
Email marketing.
Have you forgotten how powerful that is?
You’re not alone.
Early in his blogging career, Adam focused on other strategies before realization struck:
The truth is that email is far more effective at reaching your raving fans than any other tool.
When you communicate directly with your fans via email, you can be sure that your message will reach them.
No more wondering if they spotted your latest blog post in Google. Or crossing your fingers that the Facebook algorithm has worked in your favor this time.
When you use email, you control the dialogue.
And because email marketing is so cost-effective, you also control your budget too.
According to the Direct Marketing Association:
ROI for email campaigns rose 53% to an average of £38 for every £1 spent in 2014.
So, if you’ve been neglecting your email marketing efforts, now is the time to get back on track.
We’ve taken a look at three of the best email marketing tools on the market and pinpointed their key differences. Whether you’re just starting out, or you’re evaluating your current solution, this detailed comparison will help make an informed decision.
AWeber
AWeber was founded by Tom Kulzer in 1998 with a goal to make email marketing simpler and more profitable for small businesses. Since then it has grown to be one of the most popular email marketing services used by over 120,000 small businesses, bloggers and entrepreneurs around the globe.
What we love about AWeber
Signing up
Signing up to AWeber is straightforward.
Click the big green button to start your 30-day free trial. You’ll have to provide some basic details, like your name and address. Plus you’ll also have to enter your credit card details. AWeber prefers to have your credit card information so that your account runs smoothly after your free trial is over.
Getting started
Once you’ve completed the formalities you’re ready to start.
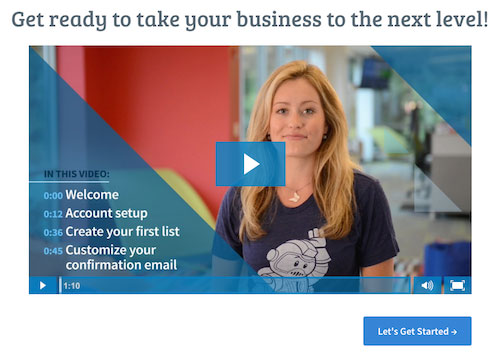
I love this welcome video. If you’re new to email marketing it explains the first few steps required to get you started:
- Account setup
- Create your first list
- Customize your confirmation email
Once you click the ‘Let’s Get Started’ button, you complete the three steps, ready to start.
User interface
The AWeber user interface is clean and pleasing to the eye. There is a logical menu, and there is always help on hand.
I’ve broken the home screen into four sections so you can see what I mean.
The first section highlights the main components of the system: Messages, Lists, and Subscribers. The information on this screen gives you an overview of your account across these areas. And it has contrasting green buttons so you can take action.

The second section highlights three different types of help that are available: Webinar, Video and Online Guide. This shows AWeber catering to how different people prefer to learn.

The third section gives you a quick overview of your subscriber stats. Each List displays its own stats, so be sure to choose the correct List at the top of the page. You also get a glance of upcoming Broadcasts (the name AWeber use for the different types of email message you send to your subscribers).
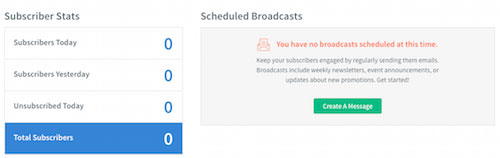
And finally, the fourth section provides information on any recently sent broadcasts plus the latest stats on your selected List (top of the page).

Message types
Messages in AWeber used to be called Broadcasts. Now they use the term Broadcasts for one type of message.
From the main Messages tab in the top menu you can access each of the different types of message.
Drafts
The Drafts page is like a holding page where you can store your draft messages, plus it also shows your active campaign messages.
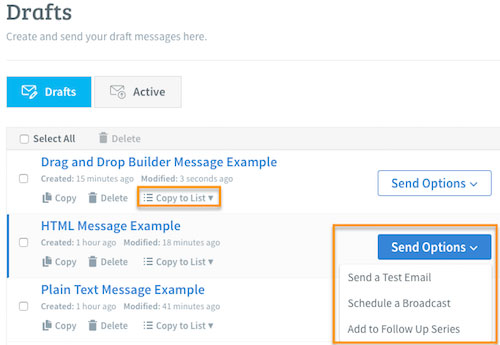
I love the ‘Copy to List’ feature. If you happen to have created a message under the wrong list, you can copy it to the correct one. Believe me; this is an easy mistake, and this is a quick solution!
What I also like is the fact that the system saves your messages to this draft status. From here you can send a test, schedule a broadcast or add to your follow up series.
Legacy Follow Up Series
Follow Ups are also known as Autoresponders. For most people, they are a fundamental part of email marketing automation.
For example, you can use these to start a welcome series of emails to new subscribers, or to deliver a subscriber-only email course like the Snackable Writing Course from Henneke.

Campaigns
Campaigns is a new email automation feature in AWeber that allows you to create and manage multiple follow-up series all within the same list.
You can build action-based automation flows using the drag-and-drop campaign editor:
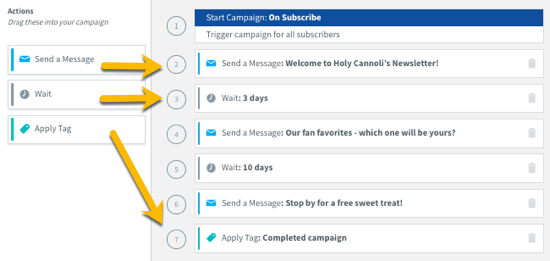
There are three actions to choose from:
- Send a Message (email)
- Wait (X number of days)
- Apply Tag (or remove a tag)
Note: Unlike GetResponse, there is no visual workflow builder.
Click automations
Tags are used elsewhere in AWeber’s marketing automation. Click automations let you segment your list and send more relevant emails to your subscribers based on the links they click. In short, you let subscribers self-select their next step.
For example, Henneke could offer two options at the end of her email course:
- Learn more about copywriting
- Learn more about blog writing
Whichever option a subscriber chooses, AWeber tags them accordingly, and they receive the relevant information for a new campaign.
Broadcasts
Broadcasts are for one-off messages. For example, you can send a message to let subscribers know that your latest blog post is live or to notify them of a special event like a webinar or a sale.
Blog Broadcasts
Blog Broadcasts allow AWeber to deliver your whole blog post via email to your subscribers using the RSS feed. I’ve never been a fan of this method, but it’s available if you want it.
Creating messages
You have three methods to create whichever type of message you decide to send.
- Drag and drop email builder – Use templates to create custom emails
- Plain text message – Create a text-only message
- HTML editor – Use WYSIWYG or edit the raw HTML
There are pros and cons to each method, and each one is easy to use.
1) Drag and drop email builder
The Drag and Drop Builder opens up endless design possibilities. You can choose from over 700 customizable, mobile responsive drag-and-drop email templates for broadcasts and follow ups. You also have the option to start with a blank canvas and design your own template.
2) Plain text message
If you’re struggling to decide which template to use then consider this:
You don’t need a template.
When you think about it, your friends don’t use a flashy email template when they email you, do they? Often a plain text email with a link to your post or page is more than adequate.
Pro Tip: Plain text emails have a higher open rate than those with images or other HTML styling [source].
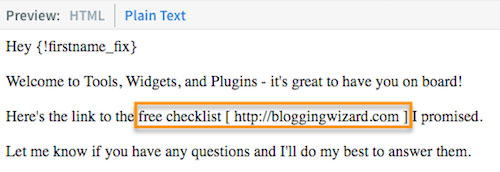
You can’t embed links in the Plain Text Message, but you can add the URL in full.
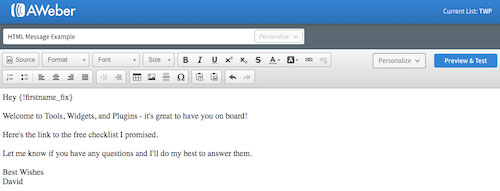
3) HTML editor
The WYSIWYG editor is a middle-ground between the previous two options. (Switching to HTML source is for serious coders only!) It’s not dissimilar to using a word processor:
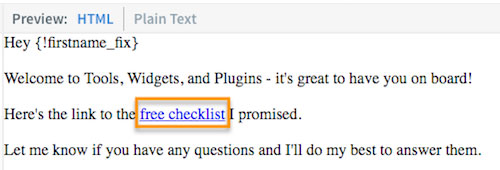
And now you can embed the link in your message:
Overall, I think AWeber have done a great job in structuring the message creation process. I like the fact that whatever type of message you create you have the same options, and that all your messages are stored in the Drafts holding page until you commit to sending to them.
List management
You can have as many lists as you like in your AWeber account. And each list has its own dedicated Follow Up series.
List options
The basic list options are all easy to follow and setup:
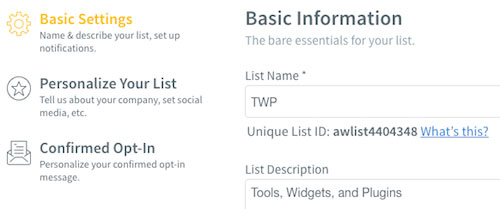
General information is pulled in from your account details and then you have the option to personalize it for each list as required.
AWeber uses a default option of Confirmed Opt-in, but you can switch this off per list as needed if you prefer.
List automation
If you have multiple lists, you can create an automation rule to automatically subscribe or unsubscribe someone from one list when they subscribe or unsubscribe to another list.
For example, if you had one list for prospects and one list for customers, then an automation rule could unsubscribe customers from your prospect list when they purchase something from you.
This is a useful way of managing your subscriber numbers.
Subscribers
The Subscribers menu lets you manage current subscribers and add new subscribers.
Manage subscribers
AWeber has some predefined filters and other field selections to manage specific users. Here is a quick snapshot to give you an idea:
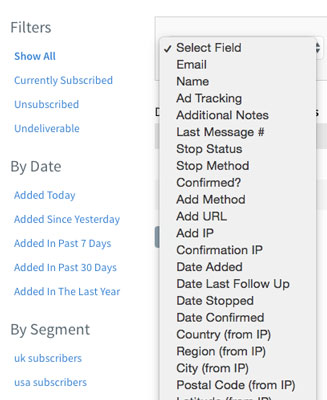
So, for example, you could select subscribers whose email address contains gmail, and at the same time save it as segment if you wish.

Adding subscribers
You can add subscribers to your lists either through a website opt-in form or manually. If you’re moving from one service provider to another, then there are tools available to export and import the lists. Alternatively, if you just need to add the odd subscriber manually, then there is also a facility for that too.
What we don’t love about AWeber
Sending messages
Once you’ve created your messages they sit in the Drafts page waiting for you to decide when and how to send them.
You can:
- Send a test email
- Schedule a broadcast
- Add to follow up series
Schedule a broadcast
When you select this option you see a selection box:

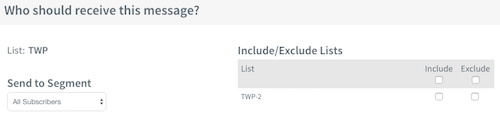
Each of the three sections is self- explanatory but somewhat limited. Look at these examples:
- Who should receive this message?
This option is crucial, but AWeber doesn’t give it enough attention. This is the time when you can perform some A/B Split Testing, for example, on two different headlines.
But there is no mention of it. No prompts on the screen.
In fact, you have to go searching in the online help section if you want to discover more about A/B split testing in AWeber.
The testing could be automated so that you could simply split your list in half and send the same message but with different headlines.
Or, you could do some preparation before this stage in managing your subscribers to create segments, and send different messages to each segment.
- When should this message be sent?
This option only offers you to select one time-zone.
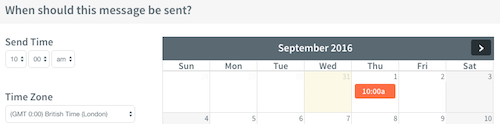
So, for example, if you choose to send your message at 10 am British time then a subscriber based in San Francisco would receive the message at 2 am. This could have an impact on the open-rate of your messages if you knew that the best time to send messages was at 10 am local time.
You could probably create segments of your list based on timezone or country to get around this problem, but you would have to copy the message multiple times for each segment you wanted to send it to. This would involve some manual work on your part each time you sent a message, so I don’t think this is good.
It’s fair to say that AWeber has not excelled in the Sending Messages process.
Subscriber counts
You need to be careful when managing the status of your subscribers because even though some might not be active, they are still counted towards your overall subscriber count, and thus the cost of your AWeber account.
- Subscribers on more than one list count each time
- Subscribers on deactivated lists will still count towards your subscriber total
- Unsubscribed addresses count toward your total number of subscribers
Pricing
When you start with AWeber, your first month is free.
Pricing is based on the number of subscribers, hence my point above about managing your total subscriber count.
![]()
GetResponse
Simon Grabowski founded GetResponse in 1998. It now serves more than 350,000 customers in 182 countries and is available in 21 different languages. They market themselves as the world’s easiest email marketing platform.
What we love about GetResponse
Signing up
Signing up to GetResponse is as simple as AWeber. The main difference is that GetResponse doesn’t take your credit card details up front. They contact you towards the end of your 30-day free trial to arrange payments.
Message types
GetResponse offers three types of messages:
- Newsletters – For sending updates to your subscribers
- Autoresponders – For sending predetermined messages, based on time or actions
- RSS to Email – For sending your entire blog post via email
Creating messages
When you want to create a Newsletter you have a couple of options:
- Drag and Drop Email Editor
- HTML Source Editor
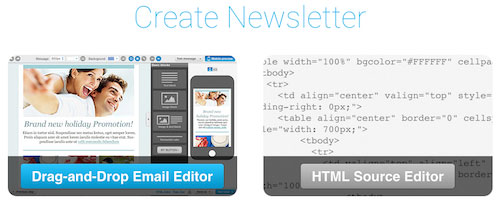
Both of these are useful and easy to use.
Pro Tip: Make sure you have selected your correct campaign before creating a newsletter. I’ve been caught out with this a couple of times.
Whichever option you choose there is a standard screen that appears first where you write your email subject line and choose your email address.
And then below that are some optional distribution settings:
- Analyze: Click-through, Google Analytics, A/B Testing
- Share: Twitter and Facebook
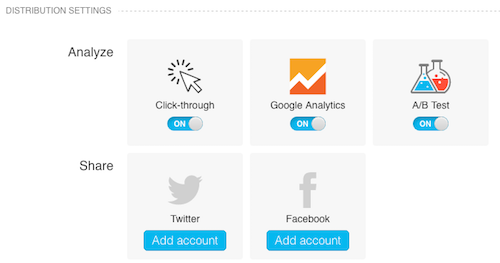
We’ll come back to the A/B Testing shortly…
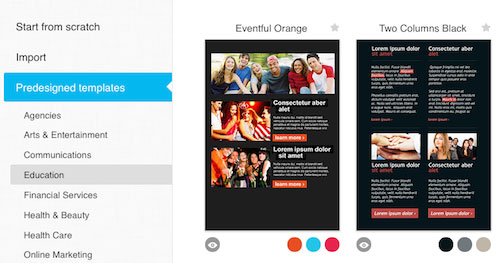
1) Drag and Drop Email Editor
Like AWeber, there are over 600 pre-designed templates that you can choose from when you create a newsletter. The templates are arranged via industry to help your selection:
If you don’t see anything you like, you can order a template from the GetResponse designers.
Alternatively, you can start from scratch to build and save your unique template. There are many blank templates to work with:
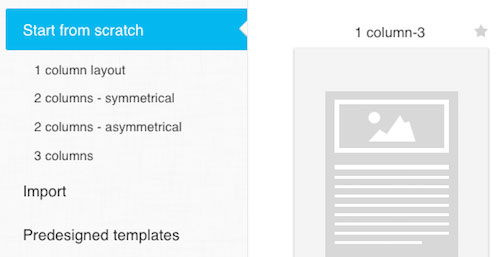
Starting from scratch can be a good idea. You get to choose exactly how much design goes into it. It is very easy to drag and drop the different elements into your message:
GetResponse also has a ‘mobile screen view’ so you can see how your design will appear on a smaller screen:

2) HTML Source Editor
The HTML Source Editor lets you switch between HTML Source and WYSIWYG. Unless you really want to code a HTML message, then stick with the latter.
The WYSIWYG Editor is similar to the one we saw in AWeber. Its ‘word processor like’ functions make it easy to format your message in no time.

When you’ve finished creating your newsletter, you can either save it as a draft or move to the next stage.
Sending messages
Remember the A/B Test option from before?
This is where you get to configure your test.
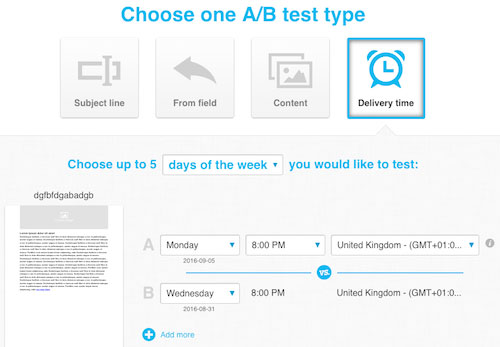
You can choose one A/B test type from:
- Subject Line – Choose up to 5 subject lines you would like to test
- From Field – Choose up to 5 from fields you would like to test
- Content – Choose up to 5 messages you would like to test
- Delivery Time – Choose up to 5 days of the week or 5 times of the day you would like to test
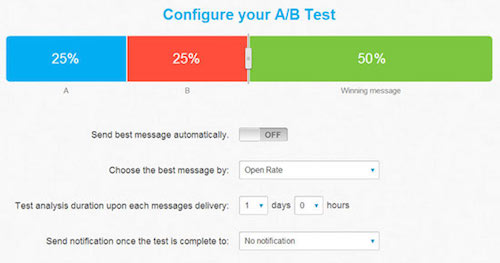
Once you’ve chosen the test type, you can select the conditions of the test.
The split test followed by winning message is an approach that I really like. But make sure you select the ‘send best message automatically’ button unless you’re monitoring this.
Split Testing is a powerful option to include and GetResponse have made it easy to configure and execute.
The final step before clicking send is to decide if you want to send your message immediately or take advantage of the super-scheduling options.
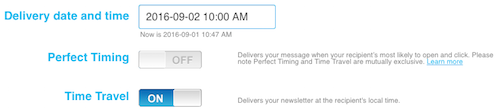
GetResponse has a couple of scheduling features:
- Perfect Timing – Delivers your message when your recipient is most likely to open and click, based on GetResponse data
- Time Travel – Delivers your message at the recipient’s local time; e.g. everyone receives it at 10 am local time
The scheduling options are excellent and can also be leveraged in the Autoresponder messages too.
Autoresponders
GetResponse has a first-rate Autoresponder.
To start with it has some triggers that you can choose from. The Time-based trigger is the most popular option. But you can use others to send messages at the precise moment someone clicks a link or opens a message.
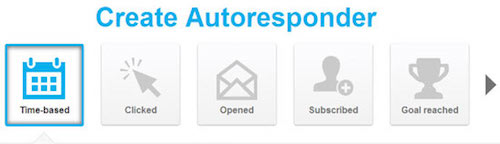
Here is what you will see for the time-based trigger:
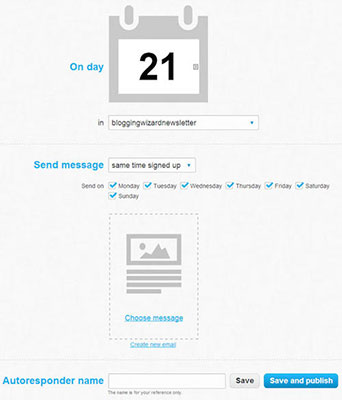
You can choose a message from your drafts, or you can create a new message. Either way, you follow the same method as the previous section including options like an A/B Test and Time Travel if you wish.
Once you’ve built up your series of autoresponder messages, GetResponse presents you with a calendar overview. Here you can see and drag messages around if you want to adjust your schedule:

Marketing Automation
A recent addition to GetResponse is their marketing automation module.
Marketing Automation uses intuitive if-then-logic:
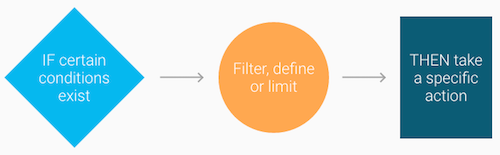
The tool searches your marketing list to find the condition you specify and take a particular action. Plus you can define even greater precision using a tool called filters.
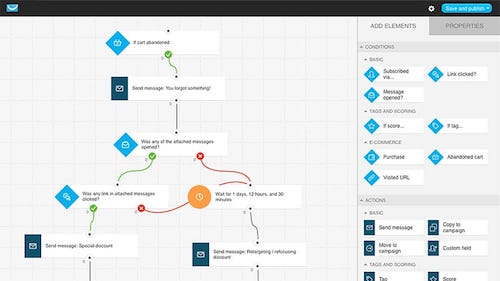
This visual platform can build workflows by arranging ready-to-use blocks:
- Conditions: Create automation events based on user behaviors; e.g. shopping cart abandoned, link clicked, item purchased.
- Actions: Take actions based on the conditions that you’ve chosen; e.g. send email, score, tag.
- Filters: Apply filters to increase the impact and add sharp targeting to your actions; e.g. send a gift certificate to 10 subscribers only.
Once you start building a visual representation of your workflow, it’s easy to drag and drop the elements to adjust your marketing efforts.
What we don’t love about GetResponse
Getting started
Personally, I don’t like the way that GetResponse automatically creates a default campaign (which is actually a list) when you sign up.

It uses details from your sign up details that don’t necessarily correspond with your preferences, and you cannot change them. You have to create a new campaign and then make it the default campaign. But this just seems to make the automatic process pointless.
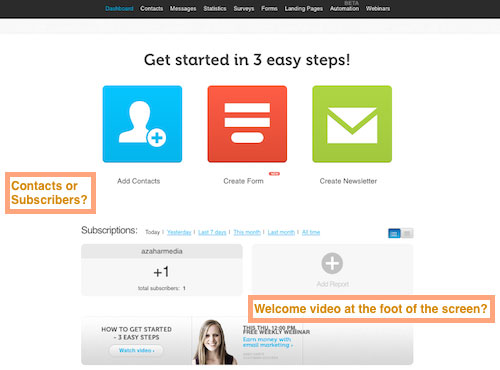
User interface
I much prefer the user interface in AWeber and MailChimp.
The GetResponse terminology is confusing:
- Why call a list a campaign?
- Why call a subscriber a contact?
The GetResponse interface comes across as more ‘salesy’ and ‘cheesey’ to me, and there doesn’t seem to be a natural flow to how elements stack up on the web page.
For example, the welcome video comes underneath all of this information?
When you take the option to watch the video series, then again GetResponse confuses terminology. They immediately talk about Building Your List – which is correct – but it contradicts with their naming convention of a campaign.

GetResponse needs to align their terminology with industry standards and make it more consistent.
Pricing
GetResponse has several different pricing plans:
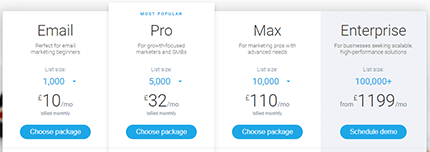
The Pro, Max, and Enterprise plans include additional features like Landing Pages, Webinars, and SalesForce integration, which we have not covered here.
So, sticking with the basic Email plan, monthly payment plans are bracketed by list size, starting at $10 per month for unlimited messages to up to 1,000 subscribers. Annual prepaid accounts receive a discount of up to 18% and biannual 30%. Special pricing is also available for registered non-profit organizations.
MailChimp
Ben Chestnut and Dan Kurzius co-founded MailChimp in 2001. The company started as a side project funded by various web-development jobs. Now it’s the world’s leading email marketing platform, sending more than a billion emails a day on behalf of its 12 million customers.
What we love about MailChimp
Signing up
Signing up to MailChimp is simple. Along the way they collect information about you and your website that is used later in other settings.
There is no credit card payment taken at this stage.
Unlike AWeber and GetResponse, MailChimp offers a free account for an unlimited time. There are conditions and restrictions to the free account, but it does give you an extended period to trial the software. [More details later…]
Getting started
Once you’ve entered your details arrive on a landing page – called the Dashboard – which is crystal clear. You’re invited to start using the software with clear calls to action; e.g. Create a Campaign, Create a List, Verify a Domain, etc.
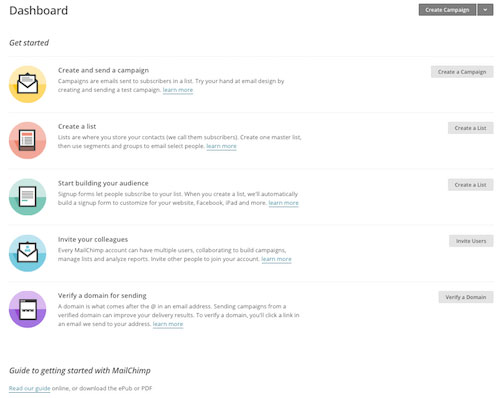
There are Learn More prompts on each section, plus an invitation to download their Getting Started guide.
User interface
The user interface is uncluttered, and the marketing terminology is spot on. Navigation is kept simple:
![]()
Message types
MailChimp refers to their messages as Campaigns.
Campaigns are emails sent to subscribers in a list.
They offer four types of campaigns:
- Regular Campaign – This is the most common type of campaign. You can design and customize your content, and choose whether to send immediately or schedule your campaign for later.
- Plain-text Campaign – This is the simplest form of mass email you can send. As the title suggests, these campaigns contain only text and have no formatting options.
- A/B Testing Campaign – These let you test things like your campaign subject line, from name, content, and send time.
- RSS Campaign – These allow you to automate your email marketing by combining content from your RSS feed with MailChimp templates.

Creating messages
The message creation process is in three steps:
- Decide which list(s) you are sending your message to
- Enter a few details like ‘subject line’ and ‘from email address’, plus select tracking options
- Choose the template for your message

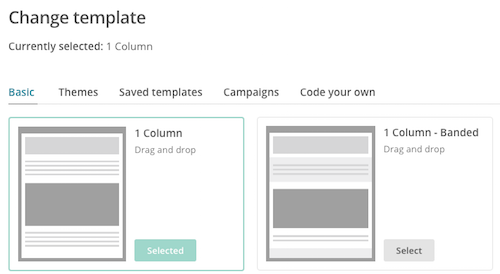
When you create a regular campaign you can choose from a few template options:
- Basic – The basic templates are blank layouts where you can add and style content to create your own customized, mobile-friendly email using the Drag and Drop Editor. I’ve found this to be the best, and easiest, option.
- Themes – The predesigned Themes offer several categories to choose from including Newsletters, Holiday, Sports, Coupons, Music, and more. These are similar to the templates we saw in AWeber and GetResponse. While they are impressive, they are not always the best option for sending emails.
- Code Your Own – This option is for the HTML coders who want to create their own design.
After you’ve used MailChimp for a while, you’ll see your templates in the Saved Templates and Campaigns tabs.
Basic
Working with the drag and drop editor is a dream. I’ve found it easier than AWeber and GetResponse.
Start off by choosing one of the 23 basic templates:
If you’re unsure which one to choose, you can open them in preview mode to give you a better idea of the layout:
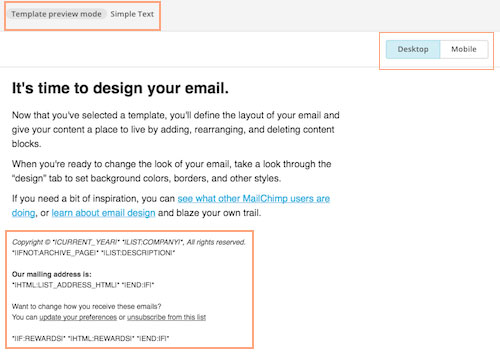
All the designs have a desktop/mobile view switch at the top which is perfect for making sure your design looks ok in both formats. And there is always a standard footer section that MailChimp populates with applicable data at delivery time.
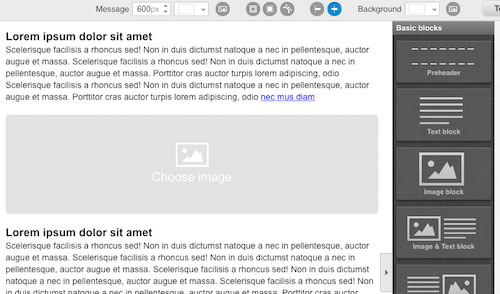
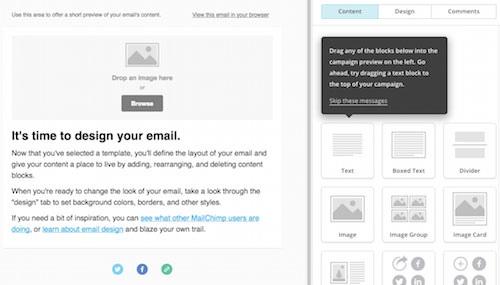
Once you’ve selected your template you can start editing the pre-populated content with your own message. If you wish to add any more blocks (e.g. image, social icons) you just drag and drop the design element from the right-hand side menu:
When you’re happy with the design, you can save it as a template for future messages. This can be an excellent time-saver if you want a ‘rinse and repeat’ system for all your campaigns. If you’re not ready to send the message straight away, you can always save it as a draft.
The final screen before you send your message is a checklist overview to ensure everything is OK.
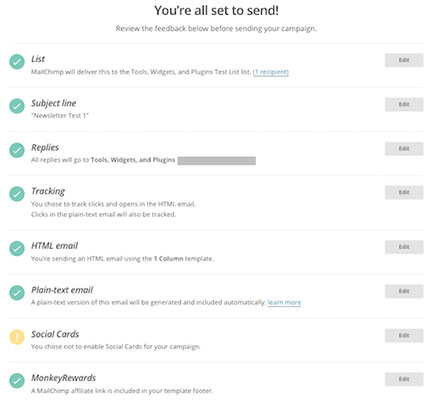
This is a reassuring feature and lets you take stock before you press the send button!
Sending messages
Sending your messages is similar to GetResponse.
You can send the message immediately, or if you’re on a paid plan, you have a couple of scheduling options.
- Timewarp – This is like the Time Travel in GetResponse, and means all of your subscribers will receive the message in their time zone; e.g. 10 am local time.
- Send Time Optimization – This option lets MailChimp decide what will be the best time to send the email to get the best open rate and clicks.

A/B testing
A/B testing runs in a similar fashion to what we saw in GetResponse.
You can choose which variable you would like to test
- Subject Line – Choose up to 3 subject lines you would like to test
- From Name – Choose up to 3 from names you would like to test
- Content – Choose up to 3 messages you would like to test
- Send Time – Choose up to 3 days of the week or 3 times of the day you would like to test
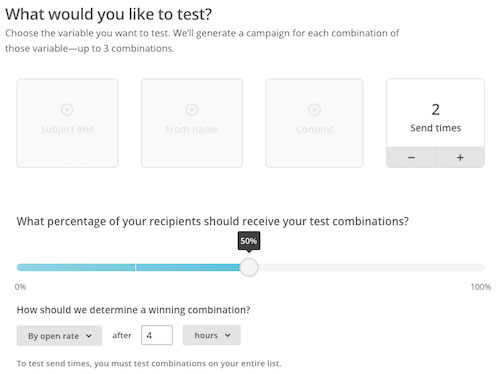
If you have a large list, you can configure the test so that 50% of your subscribers receive the test combinations. When you have a winning combination, you can send it to the remainder of your list.
Choose whether to determine a winner based on open rate, click rate, total revenue, or manually. MailChimp recommends that your test should run for a minimum of 4 hours.
List management
You can create as many different lists as you wish in your MailChimp account.
But what they promote is the idea of having one master list and dividing it into groups and segments.
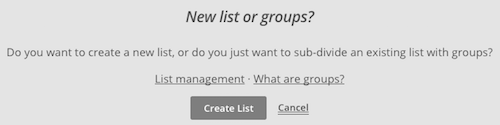
A Group is a collection of subscribers based on their interests and preferences. These can be more category-based. For example:
- WordPress
- Social Media
- SEO
A Segment is a collection of subscribers based on shared qualities, like engagement activity and group choices. For example:
- Subscribers who opened any of my last five campaigns
- Subscribers who didn’t click on my last campaign
- Subscribers who recently purchased a product
- Subscribers who live in a certain location
Subscribers
You can add subscribers to your list(s) via signup forms on the web, your Facebook page, or even directly on your Tablet (perhaps at conferences or events) using MailChimp Subscribe.
You can also import subscribers via a few channels:
- CSV or tab-delimited text file
- Copy/paste from file
- Integrated service

Automation
MailChimp has moved from the old style Autoresponder to the newer Automation feature because it offers many more options.
Autoresponders restrict you to sending a single email based on a subscriber’s action.
MailChimp’s Automation lets you create a targeted series of emails triggered by a specific date, event, or subscriber’s activity.
MailChimp has pre-built some automation workflows into various categories to help you. Here’s an example of the E-Commerce Automation:

There are also ideas for Education, Music, Software, Non-profit, and standard List Activity. But you don’t have to use these ideas; you can create custom workflows too.
What we don’t love about MailChimp
No visual automation
It’s a shame that MailChimp have not embraced visual automation like GetResponse.
Visual workflows for automation are a lot easier to get to grips with.
While the MailChimp’s automations are extensive, they feel a little overwhelming without a visual workflow tool.
You can’t send to multiple lists
When you start a campaign in MailChimp, one of the parameters you select is the list. However, you can only choose one list at a time.
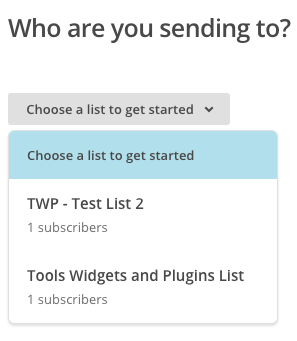
You can work around this by replicating the message and choosing another list next time.

But depending on how many lists you have created this could become tiresome.
Think about using segments and groups rather than multiple lists in MailChimp.
Pricing
MailChimp has a few different pricing options. Let’s take a look:
- Forever Free
The Forever Free plan, as its name suggests, lets you have a free email marketing service forever; i.e. it’s not limited to 30 days. However, the condition is that you can only have up to 2,000 subscribers, and you can only send up to 12,000 emails per month.
It’s ideal for getting started, and you have access to most of the features, although some are not included; e.g. predicted demographics and delivery by time zone.
Note: Free accounts do not have access to email and chat support. You can upgrade your account for full access to technical support.
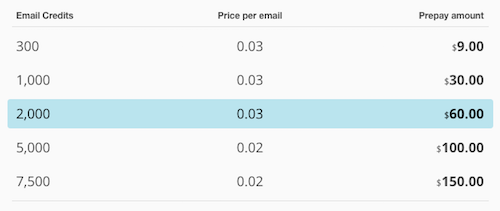
- Prepay
Prepay is the next step up. You can access all the features, but without the commitment of a monthly fee. As MailChimp puts it,
If you’re not a frequent sender, you can purchase credits that work like stamps for email.
For example, you could buy 300 email credits for $9.
- Monthly
The monthly plans include all features and support. They start from $10/month for up to 500 subscribers.

There are no annual discounts with MailChimp like we saw with Aweber and GetResponse. However, they do offer a 10% Security Discount if you add two-factor authentication to your account.
Conclusion
I promised you some comparison tables to help inform your decision on these three excellent email marketing tools.
But first, I wanted to cover the topic of list building, as this is a common factor for whichever solution you select.
List building
List Building is a crucial part of email marketing. And most marketers realize the importance of placing opt-in forms in strategic places to capture new email subscribers.
AWeber, GetResponse, and MailChimp all have their own signup forms that you can use on your website to capture email addresses for your list(s).
The built-in signup forms are OK to get you started. And each service provider has a few templates that will probably fit in with your website design.
However, in the long-run, you’ll want to consider investing in a separate lead generation tool to build your email list. As Adam says:
The old solutions of just using any old opt-in form that came with our email provider aren’t enough.
Tools like Thrive Leads, Optin Monster, and Leadpages all have far greater lead capture features, and integrate with all the major email marketing service providers.
Comparison tables
OK, so as promised, we’ve put together some handy comparison tables on features and pricing.
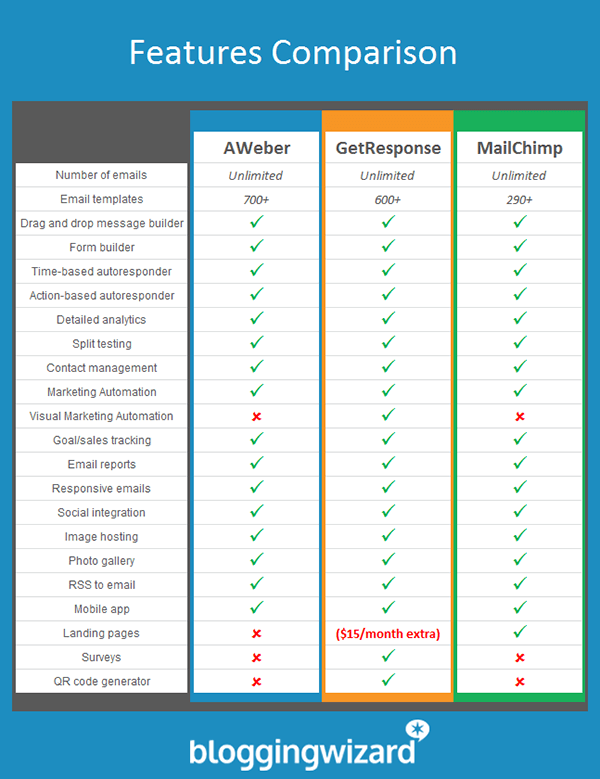
Features
First, we have a feature comparison chart to give you a quick checklist of what each platform has to offer:
Pricing
Next, we have a pricing comparison table to give you an overview of how each platform compares. Note that MailChimp offers more options with their smaller intervals:
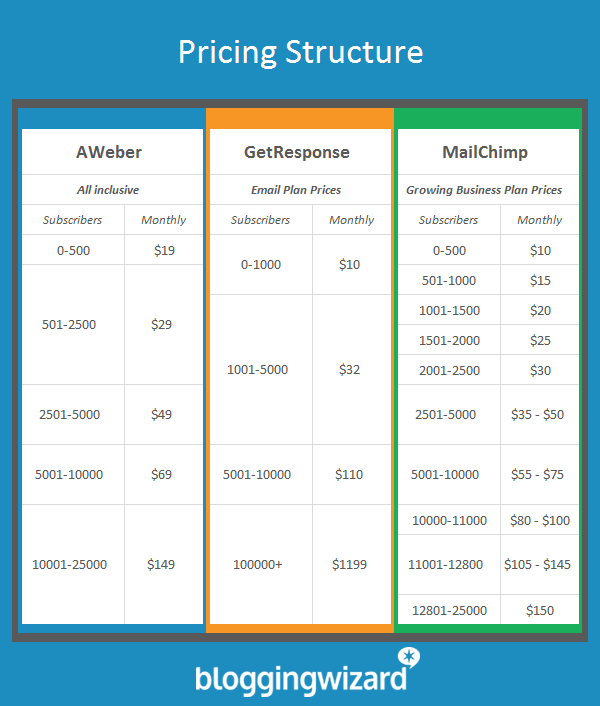
AWeber and GetResponse offer a free 30-day trial, whereas MailChimp offers a ‘Free Forever’ plan which supports up to 2000 email subscribers and 12000 emails per month but with limited features.
Try AWeber Try GetResponse Try MailChimp
Our top pick
All three of these email marketing services are top notch.
If you’re just starting out, and you need to control costs, then MailChimp’s Forever Free option is great. You get a lot of features packed into the free service, and if you need to extend a little, you can move up to the Prepay option.
The monthly pricing from MailChimp is also very attractive to new starters because it is more granular moving up in bands of 500 subscribers. This is an excellent option for a small business that is making steady growth.
AWeber’s monthly pricing plan increases sharply once you pass 500 subscribers. GetResponse’s initial pricing plan allows 1000 subscribers and is slightly cheaper than AWeber.
As your subscribers increase all three have similar price points.
There is not a lot of difference when comparing features. Each platform achieves most things in their own way. AWeber falls short with it’s A/B Testing features and scheduling facilities. Improving those two things alone would bring it on par with GetResponse and MailChimp.
GetResponse’s new visual marketing automation is eye-catching and if you’re at a stage where you want to develop more automated workflows, then this could be the tool for you. That said, MailChimp’s automation features are useful, but not visual.
GetResponse lets itself down with its user interface and terminology. It wouldn’t take much to make it industry compliant. If you’re comfortable with their interface, then this won’t be an issue for you.
Overall, MailChimp just shades it. They have a more polished platform with an easy-to-use interface that is self-explanatory. The online help guides are also extremely helpful, so without having to call support, you can work most things out.
Which one is for you?
If you’re still undecided then I recommend diving in and taking advantage of the free trials that each platform offers.
If you’re already using one of these services let us know what you like best, and where your provider could improve.
Disclosure: This post contains affiliate links which means we may get a commission if you make a purchase. Our opinions are our own and we only share what we believe you’ll find helpful. You won’t pay anything extra but it helps us support the running of this website and continue to publish helpful content. Thank you!
The post AWeber vs GetResponse vs MailChimp: A Detailed Comparison Review appeared first on Blogging Wizard.
[ad_2]
source_link MMO mastermind
No comments:
Post a Comment